|
Embedded System - Arduino |
||
|
Sensor Basic
In this page, I will explain about how you operate various sensors with Arduino board. There are whole a lot of different sensors you can play with Arduino. Even though all those sensors would have different functionalities, the basic operation and circuitary is almost same as shown below regardless of what kind of sensor they are. Actually, you need to build a circuit around the sensors to make it possible to operate using the following circuit. However, if you purchase any Arduino compatitble sensor module, the module itself already built all the necessary cuircuits on the module to make following connection possible. So, all you need to do is just to do a couple of wiring and write a couple of lines of code.
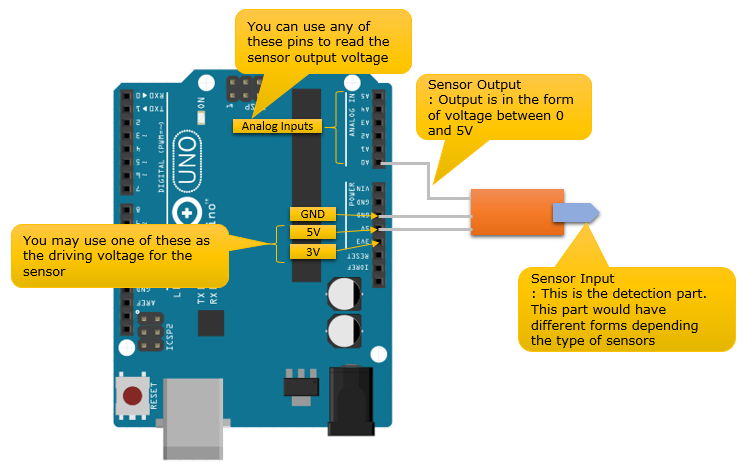
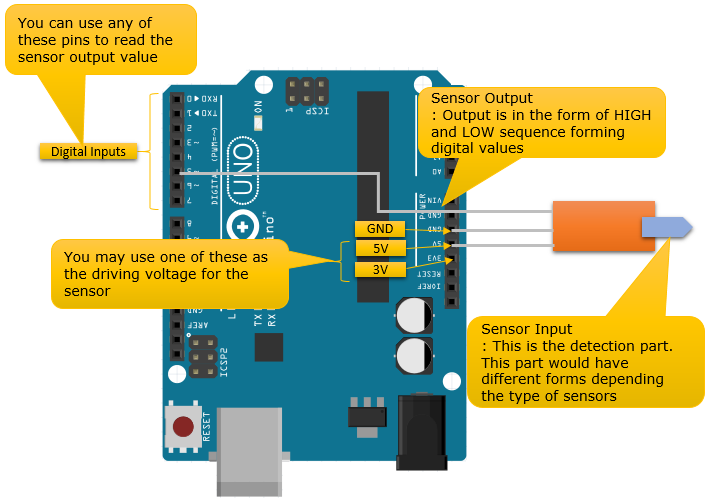
Roughly there are two types of sensor. One is Analog Sensor that measure some thing and generate output (sensor value) in the form of analog signal (analog voltage) and the other one is Digital Sensor that enerate output (sensor value) in the form of digital signal. Personally, I would recommend you to use Analog sensors if you have choice because it would be easier with programming. If you use digital sensors, you need to do a little bit complicated programming to process the sequence of digital pulses (serial data) into a value. (You don't have to worry too much about this since most of the digital sensor module provide you their own C API (function) that does all these processing for you. In terms of Arduino programming, it would not be much different from Analog Sensor program. However, if you are a type of person who wants to understand every details whatever it is, you would need to invest pretty much of time and effort to understand the C API provided by the sensor maker or any open-source project)
Following shows the typical circuit for Analog sensors.
Following shows the typical circuit for Digital sensors.
Before you buy a sensor module
I think most of Arduino compatible sensor module are already designed in such a way that can electrically fit to the cuircuit shown above, but I would suggest you to check some basic things as follows before you buy a sensor module.
Potentiometer
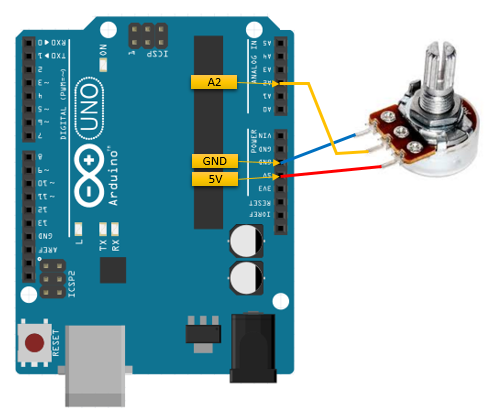
In this section, I will show you how to use (operate) a potentiometer with Arduino. I picked this one as the first example since it would be the simplest and probably the cheapest one you can get. You can connect a Potentiometer as shown below. I used the A2 pin in this example, but you can use any Analog pins as you want. After I read the potentiometer value, I will send the data to the PC that is connected to Arduino via serial port just for simplicity. So you'd better understand how to use Serial port in Arduino before you go through this example (Refer to Serial Comm page on how Serial communication works in Arduino )
Following is the Arduino Code for this example. As you see, it is very simple... just read the value from A2 pin and write the value through the serial port.
int potentiometerValue = 0; // This variable is to store the sensor value that was read through the analog pin char potOut[255]; // This variable is to store the string containing the sensor value
void setup() { // Initialize the serial port with the baud rate of 9600 Serial.begin(9600); }
void loop() { // Read the analog input value from A2 pin and store the result to potentiometerValue potentiometerValue = analogRead(A2);
// create a string that contains the sensor value and some additional text. As you see here, // you can use the standard C language funtion in Arduino code. // At first I tried "String potOut = "Potentiometer value =" + analogRead(A2);", but somehow this // sent a strange looking string. So I used the native C function. sprintf(potOut,"Potentiometer value = %d",potentiometerValue);
// sent the string via Serial port Serial.println(potOut);
// sleep 1 sec delay(1000); }
Run the code and rotate the knob of the potentiometer as the program is running. You would get the result something as follows. (The exact value may differ from what you get, but you see some changing values as you rotate the knob)
Temperature / Humidity Sensor
Since this type of sensor would be pretty complicated to understand the details and the page would be pretty long, I posted it in a separate page : titled as DHT.
Light Sensor
I got a simple light sensor from OSEPP which detect the intensity of light around it and output the result as in the form of analog signal. I am posting the tutorial in a separate page : titled as Light Sensor
|
||